|
 |
Building and Maintaining
Worm Compost Bins
-Supplies-
building materials
- 1 4x8-foot sheet of 1/2-inch exterior plywood
- 1 12-foot length of 2x4 lumber
- 1 16-foot length of 2x4 lumber
- 1/2 pound of 16d galvanized nails
- 2 pounds of 6d galvanized nails
- 2 galvanized door hinges
- optional: 1 pint of clear varnish or polyurethane
- optional: plastic sheets for placing under and over bin
- 1 pound of worms for every 1/2 pound of food wastes produced
per day
- bedding for worms: moistened shredded newspaper or cardboard,
or brown leaves
tools
- tape measure
- hand saw or skill saw
- hammer
- saw horses
- long straight-edge or chalk snap line
- screwdriver
- drill with 1/2-inch bit
- eye and ear protection
- work gloves
- optional:paint brush

-Building Directions-
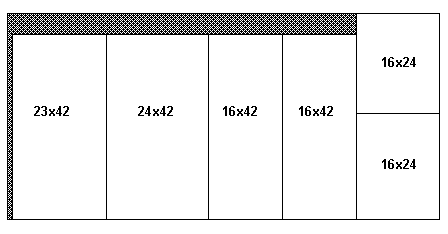
- Measure and cut the plywood as shown above, to make one
24x42-inch top, one 23x42-inch base, two 16x24-inch ends, and
two 16x42-inch sides
- Cut the 12-foot length of 2x4 lumber into five pieces: two
39-inch pieces, two 23-inch pieces, and one 20-inch piece.
- Lay the five pieces on edge on a flat surface to form a
rectangle with the long pieces on the inside and the 20-inch
length centered parallel to the ends. Nail the pieces together
with the two 16d nails at each joint.
- Nail the 23x42-inch piece of plywood onto the frame with 6d
nails every three inches.
- Cut four 1-foot lengths from the 16-foot length of 2x4 lumber.
(Save the remaining 12-foot piece). Take the two 16x42-inch
pieces of plywood and place a 1-foot flat against each short end
and flush with the top and side edges. Nail the 2x4's in place
using 6d nails.
- Set the plywood sides up against the base frame so that the
bottom edges of the plywood sides overlap the base frame. Nail
the plywood sides to the base frame using 6d nails.
- To complete the box, nail the 16x24-inch pieces of plywood
onto the base and sides at each end.
- To reinforce the box, make sure a nail is staggered at least
every three inches wherever plywood and 2x4's meet.
- Drill 12 1/2-inch holes through the plywood bottom of the box
for drainage.
- To build the frame for the lid, cut the remaining 12-foot
piece of the 16-foot length of 2x4 lumber into two 45-inch
pieces and two 20-inch pieces. Lay the pieces flat to form a
rectangle, with the short pieces on the inside.
- Lay the 24x42-inch piece of plywood on top of the lid frame so
the plywood is 1 1/2 inches inside all the edges of the frame.
Nail the plywood onto the frame with 6d nails.
- Attach the hinges to the inside of the back of the box at each
end (on the 2x4) and the corresponding undersides of the back
edge of the lid frame, so the lid stands upright when opened.
- The unfinished box should last for at least five years;
finishing the box with varnish or polyurethane will protect the
wood and prolong the life of the box. Two coats of varnish with
a light sanding between coats should be sufficient.
- Find a good location for the box. It can be placed anywhere as
long as the temperature is more than 50 degrees F (10 degrees
C). The most productive temperature is 55-77 degrees F (13-25
degrees C). Garages, basements, and kitchens are all
possibilities as well as the outdoors in warm weather (not in
direct sunlight). Make sure to place the box where it is
convenient for you to use. It is wise to place a plastic sheet
under the box.
adding the worms.
Moisten the bedding material for the worms by placing it in a
5-gallon bucket and adding enough water to dampen all material.
Don't worry about getting the bedding material too wet because
the excess moisture will drain off when it is placed in the
compost bin. It is a good idea to put wet bedding material into
the bin outdoors and wait until all the water has drained out
(1-2 hours).
Add about 8 inches of moistened bedding to the bottom of one
side of the bin. Put in the worms. Leave the lid off for a while
and the worms will work down into the bedding away from the
light.
adding your wastes.
Dig a small hole in the bedding and add your vegetable and fruit
scraps. Cover the hole with bedding. Small amounts of meat can
be added in the same way. Do not add anything inorganic or
potentially hazardous material such as chemicals, glass, metal,
or plastic.
maintaining your compost pile.
Keep your pile moist, but not wet. If flies are a problem, place
more bedding material over the wastes. Every three to six
months, move the compost to one side of the bin and add new
bedding to the empty side. At this time, add food wastes to the
new bedding only. Within one month, the worms will crawl over to
the new bedding and the finished compost on the old side can be
harvested. Then add new bedding to the old side.
For more information, please see The
Worm Woman's Web Site by Mary Appelhof.
My condolences to the loved
ones of Mary Appelhof, June 11, 1936 - May 4, 2005.
Click
here to read Mary's obituary.
|
|
| |


